
One of the things I have been studying is the pipeline typically used for deepfake generation. Faceswap Github is an example of one of the popular ones. Looking through this we can see that there are potentially several properties and surfaces we can attack.
\n\nTo understand roughly what is happening in this process I will explain a little what I have gleaned from digging into the code. The code is split up into 3 major sections
\n\nI will summarize the process, but a more in-depth blog that is very helpful is available here https://www.alanzucconi.com/2018/03/14/introduction-to-deepfakes/
\n\nExtracting is similar to what many of us are doing where we extract faces from the larger 1920x1080 video down to the specific region of interest. In the variant I analyzed there were a few key differentiation from what I see people doing. Rather than using a bounding box, facial keypoints are found and then a transform matrix is computed to flatten the face down to a fixed size.
\n\n
This does a slightly better job at making the whole 256x256 all face without capturing other background information or wasting any space with blank padding or resizing and it also makes it so all images are looking directly straight on. The disadvantage of this is that it utilizes the cv2.warpaffine function which relies on stretching and interpolating in order to warp the key points to a flattened and fixed size.
\n\nThe input to this process is a bunch of videos or images of an individual and the output is a bunch of aligned face images of a fixed size. Can be adjusted to be 64x64, 128x128 or 256x256. Along with the images an alignment matrix and the facial keypoints are written which represents the transform that was required to extract that aligned face image. This will be useful later during the convert step. The fact that the images need to be generated at a fixed size and then warped to a new size is a potential attack vector to determine fakes and could be a highly generalizable attack until alternate methods that dont use that are developed.
\n\nThe training process then takes these images we extracted and trains two separate auto encoders, one for our source and one for our target. So let's say we are trying to put your face on Arnold Schwarzenegger. You are the source and Arnold is the target. One network will be trained that has an encoder that creates a compressed representation of your face and then a decoder tries to recreate it from this compressed representation. This process will be repeated for Arnold. In the deepfake process the decoder for Arnold would then be swapped with the decoder that was trained on your face. Once again, due to the limitations of NN architectures, the output will always be a fixed resolution. This step will likely rapidly evolve along with the new neural network advancements and loss functions and other various tricks like we have seen with GANS. The current models are already quite good, but as more researchers approach the problem likely they will get significantly better. \n
This section will then combine the faceswapping NN and the facial keypoints in order to generate the new video. In this process, the target video facial keypoints are found (or reused if the video was used during the training phase) and the face is flattened to the fixed size previously trained. That image is passed to the encoder for Arnold and the decoder for your face. This generates a new image of a fixed size that is supposed to somewhat closely match the original faces pose and condition.
\n\nThen the inverse of the transform that was used to extract the source image is used to warp the generated image onto the target image. The generated image is not simply pasted on top of the target image though. From here the image might be gaussian blended around the edges back with the original and only the regions within some of the original facial keypoints might be kept. for example between the eye brows and above chin. Another process that is sometimes applied is some histogram normalization like CLAHE, this makes the color and brightness match more between the generated and target images. There are various other options, but those seem to be the major ones.
\n\nReviewing this process I see a few different attack surfaces.
\n\nOne of the things I have been studying is the pipeline typically used for deepfake generation. Faceswap Github is an example of one of the popular ones. Looking through this we can see that there are potentially several properties and surfaces we can attack.
\n\nTo understand roughly what is happening in this process I will explain a little what I have gleaned from digging into the code. The code is split up into 3 major sections
\n\nI will summarize the process, but a more in-depth blog that is very helpful is available here https://www.alanzucconi.com/2018/03/14/introduction-to-deepfakes/
\n\nExtracting is similar to what many of us are doing where we extract faces from the larger 1920x1080 video down to the specific region of interest. In the variant I analyzed there were a few key differentiation from what I see people doing. Rather than using a bounding box, facial keypoints are found and then a transform matrix is computed to flatten the face down to a fixed size.
\n\n
This does a slightly better job at making the whole 256x256 all face without capturing other background information or wasting any space with blank padding or resizing and it also makes it so all images are looking directly straight on. The disadvantage of this is that it utilizes the cv2.warpaffine function which relies on stretching and interpolating in order to warp the key points to a flattened and fixed size.
\n\nThe input to this process is a bunch of videos or images of an individual and the output is a bunch of aligned face images of a fixed size. Can be adjusted to be 64x64, 128x128 or 256x256. Along with the images an alignment matrix and the facial keypoints are written which represents the transform that was required to extract that aligned face image. This will be useful later during the convert step. The fact that the images need to be generated at a fixed size and then warped to a new size is a potential attack vector to determine fakes and could be a highly generalizable attack until alternate methods that dont use that are developed.
\n\nThe training process then takes these images we extracted and trains two separate auto encoders, one for our source and one for our target. So let's say we are trying to put your face on Arnold Schwarzenegger. You are the source and Arnold is the target. One network will be trained that has an encoder that creates a compressed representation of your face and then a decoder tries to recreate it from this compressed representation. This process will be repeated for Arnold. In the deepfake process the decoder for Arnold would then be swapped with the decoder that was trained on your face. Once again, due to the limitations of NN architectures, the output will always be a fixed resolution. This step will likely rapidly evolve along with the new neural network advancements and loss functions and other various tricks like we have seen with GANS. The current models are already quite good, but as more researchers approach the problem likely they will get significantly better. \n
This section will then combine the faceswapping NN and the facial keypoints in order to generate the new video. In this process, the target video facial keypoints are found (or reused if the video was used during the training phase) and the face is flattened to the fixed size previously trained. That image is passed to the encoder for Arnold and the decoder for your face. This generates a new image of a fixed size that is supposed to somewhat closely match the original faces pose and condition.
\n\nThen the inverse of the transform that was used to extract the source image is used to warp the generated image onto the target image. The generated image is not simply pasted on top of the target image though. From here the image might be gaussian blended around the edges back with the original and only the regions within some of the original facial keypoints might be kept. for example between the eye brows and above chin. Another process that is sometimes applied is some histogram normalization like CLAHE, this makes the color and brightness match more between the generated and target images. There are various other options, but those seem to be the major ones.
\n\nReviewing this process I see a few different attack surfaces.
\n\n
Bonus garbage 64x64 image that comes from the simple deepfake model I configured. Didnt allow it to converge too much or show it too many images, but this is trying to generate a face similar to the one shown from the extraction step.
", "rawMarkdown": "\n\nBonus garbage 64x64 image that comes from the simple deepfake model I configured. Didnt allow it to converge too much or show it too many images, but this is trying to generate a face similar to the one shown from the extraction step. ", "votes": 2 }, { "id": 769274, "postDate": "2020-03-11T17:57:13.373Z", "rawMarkdown": "", "isDeleted": true }, { "id": 767606, "postDate": "2020-03-09T22:01:07.130Z", "rawMarkdown": "", "isDeleted": true } ], "comments": [ { "id": 768796, "author_name": "ryches", "author_url": "", "post_date": "2020-03-11T07:43:28.713000", "content": "
Bonus garbage 64x64 image that comes from the simple deepfake model I configured. Didnt allow it to converge too much or show it too many images, but this is trying to generate a face similar to the one shown from the extraction step.
", "votes": 2, "replies": [] }, { "id": 769274, "author_name": "", "author_url": "", "post_date": "2020-03-11T17:57:13.373000", "content": "", "votes": 0, "replies": [] }, { "id": 767606, "author_name": "", "author_url": "", "post_date": "2020-03-09T22:01:07.130000", "content": "", "votes": 0, "replies": [] } ], "raw_markdown_by_id": { "767151": "One of the things I have been studying is the pipeline typically used for deepfake generation. [Faceswap Github](https://github.com/deepfakes/faceswap) is an example of one of the popular ones. Looking through this we can see that there are potentially several properties and surfaces we can attack. \n\nTo understand roughly what is happening in this process I will explain a little what I have gleaned from digging into the code. The code is split up into 3 major sections\n\n1. **Extract**\n2. **Train**\n3. **Convert**\n\nI will summarize the process, but a more in-depth blog that is very helpful is available here https://www.alanzucconi.com/2018/03/14/introduction-to-deepfakes/\n\n## 1. Extract\nExtracting is similar to what many of us are doing where we extract faces from the larger 1920x1080 video down to the specific region of interest. In the variant I analyzed there were a few key differentiation from what I see people doing. Rather than using a bounding box, facial keypoints are found and then a transform matrix is computed to flatten the face down to a fixed size. \n\n\n \n\nThis does a slightly better job at making the whole 256x256 all face without capturing other background information or wasting any space with blank padding or resizing and it also makes it so all images are looking directly straight on. The disadvantage of this is that it utilizes the cv2.warpaffine function which relies on stretching and interpolating in order to warp the key points to a flattened and fixed size. \n\nThe input to this process is a bunch of videos or images of an individual and the output is a bunch of aligned face images of a fixed size. Can be adjusted to be 64x64, 128x128 or 256x256. Along with the images an alignment matrix and the facial keypoints are written which represents the transform that was required to extract that aligned face image. This will be useful later during the convert step. The fact that the images need to be generated at a fixed size and then warped to a new size is a potential attack vector to determine fakes and could be a highly generalizable attack until alternate methods that dont use that are developed. \n\n## 2. Train\nThe training process then takes these images we extracted and trains two separate auto encoders, one for our source and one for our target. So let's say we are trying to put your face on Arnold Schwarzenegger. You are the source and Arnold is the target. One network will be trained that has an encoder that creates a compressed representation of your face and then a decoder tries to recreate it from this compressed representation. This process will be repeated for Arnold. In the deepfake process the decoder for Arnold would then be swapped with the decoder that was trained on your face. Once again, due to the limitations of NN architectures, the output will always be a fixed resolution. This step will likely rapidly evolve along with the new neural network advancements and loss functions and other various tricks like we have seen with GANS. The current models are already quite good, but as more researchers approach the problem likely they will get significantly better. \n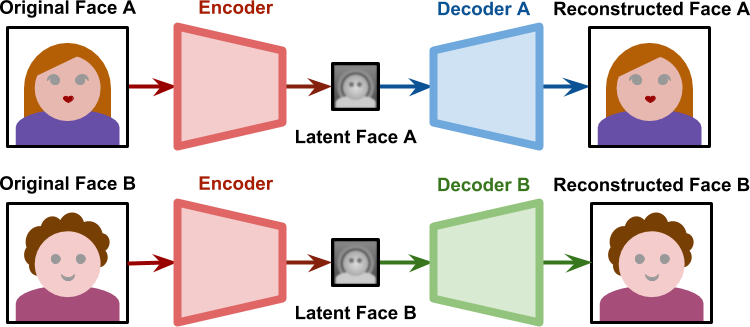\n\n## 3. Convert\n\nThis section will then combine the faceswapping NN and the facial keypoints in order to generate the new video. In this process, the target video facial keypoints are found (or reused if the video was used during the training phase) and the face is flattened to the fixed size previously trained. That image is passed to the encoder for Arnold and the decoder for your face. This generates a new image of a fixed size that is supposed to somewhat closely match the original faces pose and condition. \n\nThen the inverse of the transform that was used to extract the source image is used to warp the generated image onto the target image. The generated image is not simply pasted on top of the target image though. From here the image might be gaussian blended around the edges back with the original and only the regions within some of the original facial keypoints might be kept. for example between the eye brows and above chin. Another process that is sometimes applied is some histogram normalization like CLAHE, this makes the color and brightness match more between the generated and target images. There are various other options, but those seem to be the major ones. \n\n## Attack Surfaces\n\nReviewing this process I see a few different attack surfaces. \n\n1. The warp and unwarp process introduces some interpolation and stretching. If that could be detected then it should be able to accurately classify almost any video (given that isnt hidden by compression or some other method). That is the basis for this paper https://github.com/danmohaha/CVPRW2019_Face_Artifacts\n2. The generated images can be differentiated from original images. This is what most people are tackling in this competition. \n3. The blending process could potentially be detected\n4. The CLAHE and other post-processing options might be able to be detected\n5. Deepfake detection is at the mercy of facial recognition models. Inspecting regions of various facial recognition models may unveil which facial recognition model was used or localize regions of suspicion and point to non-face areas that have been altered due to recognition errors. \n6. Continuity is never enforced. The methods used all seem to be at a frame by frame basis so there is nothing that captures the expected continuity across frames. Some form of temporal model could likely discover this, but its also possible that even simpler methods looking at variance between frames might be able to detect altered behavior. This might be a little bit difficult since some of the videos also feature moving people and moving camera angles. ", "768796": "\n\nBonus garbage 64x64 image that comes from the simple deepfake model I configured. Didnt allow it to converge too much or show it too many images, but this is trying to generate a face similar to the one shown from the extraction step. ", "769274": "", "767606": "" } }